7 Simple Yet Awesome Computer Games
There are the monolith video games that take a massive development and design crew several years to make. You know, those video games that will not run on your computer(tm). Titles like Call of Duty and Crysis. Then there are the indie games with an average development crew size of 1 person, the ones that do not feature state-of-the-art graphics or super-realistic physics engines but still, somehow, manage to keep you entertained for hours on end. These are great games, and they are an exceedingly rare occurrence nowadays.
Let me introduce you to a few.
Teeworlds
 Imagine Soldat combined with a link gun á la Scorpion (Mortal Kombat) and the same body layout as the Weebl characters. That’s Teeworlds. In other words: Pure awesomeness. This baby will keep you entertained for many a tee-fragging/dragging/bashing hour. Teeworlds is a perfect mix of Quake, Worms, Soldat and pie-loving. Remarkably violent whilst cute.
In comparison to Soldat, the weapons arsenal is more akin that of Quake 3, the jetpack is replaced by a Spiderman-style link gun and your primary weapon is a giant wooden hammer.
Whoever said games need to have lots of gore to be interesting? Give us tees with rocket launchers, link guns and ninjas (yes, there are ninjas) in a cartoon environment and we’re set!
Free. Available for Windows, OS X and Linux. Website | Download
N-Game
 N-Game is a unique 2D puzzle/action platform game somewhat similar to Lode Runner. The main character, you, is a ninja (yes, the N is for ninja!) trapped in a world of well-meaning, inadvertently homicidal robots.
What makes this game awesome, apart of course from there being ninjas, is its slamming ragdoll physics system. Limbs flying around and about is never a bad thing.
A very frustrating, yet very fun and addictive game.
Free. Available for Windows, OS X and Linux. Website | Download
Elasto Mania (Elma)
 Boing boing. Get ready to bounce up and about collecting ’em apples. Elasto Mania, or Elma, is about apples, flowers and bikes with super-elastic wheels. Drive over a hill, plummet to the ground and recoil into the air, all while not sustaining trauma to the skull.
This was probably one of the first game to include ‘physics’ (the wheels stretch and bend). That, combined with the ability to change your facing by pressing Space makes this a game that is adept at consuming a lot of your time.
Shareware, $9.95. Available for Windows. Website | Download (Trial)
Phun
 Phun is a 2D physics sandbox. Create whatever you’d like, wherever you’d like and see what would happen in the real world. I think I’d be a genius today if I’d had this to play with as a child — there’s virtually no limit to what you can make here.
The playful synergy of science and art is novel, and makes Phun as educational as it is entertaining.
It may look like a toy, but Phun is based on highly competitive technologies for interactive multiphysics simulation, ranging from novel physical models and variational integrators to high performance numerical methods.
Free. Available for Windows, OS X and Linux. Website | Download
Soldat
 Of course, the obligatory Soldat. This is a fun little 2D shooter based on games like Quake, Counter-Strike, Liero and Worms. Choose from an arsenal of weapons á la Counter-Strike and blow stuff to oblivion and beyond. And while you’re blowing stuff up, gaze in awe as the games ragdoll physics system makes the aftermath a nice show of debris tumbling down hills and bouncing off crates.
If you need to get around, your character is very fittingly equipped with a jetpack. Oh, and one of the selectable weapons is a minigun.
Free. Available for Windows and Linux (Wine). Website | Download
Winterbells
 Rabbits. Bells. Pigeons. Winterbells is a flash game that’s somewhat like Pinball — except you control the ball with your mouse, and there are no flippers, should you miss a bopper.
For each bell you hit, the score for each bell goes up a little. For each pigeon you hit, your current score doubles. Yes, doubles. You’ll find that if you hit a few birds, your high score quickly becomes too high to count!
The game isn’t the least bit complicated, but you’ll find it isn’t too easy keeping your focus. Very, very addictive.
Free. Available for all browsers with Flash. Website | Play
The World’s Hardest Game
 Let’s just say the title isn’t exactly an exaggeration. This game will piss you off. Immensely. But it’s fun (generally), and that’s what matters! It’s a 2D puzzle game where the objective is to collect coins and get to the finish area without getting hit by all kinds of crap. It’s really very hard.
There is also a The Worlds Hardest Game 2, which is basically just additional levels. It can be found here.
Free. Available for all browsers with Flash. Website | Play
Bonus: World of Goo
 I can’t let this one go unmentioned, even if it is newer than this article. This is, by far, one of the most entertaining and innovative indie game I’ve played in years.
World of Goo is a physics based puzzle / construction game. The millions of Goo Balls who live in the beautiful World of Goo don’t know that they are in a game, or that they are extremely delicious.
$20.00. Available for Windows, OS X and Linux. Website | Demo
Praise goes to the authors of these games. They certainly deserve it; they have managed to make games so original, so enticing that top-notch physics engines and two-digit DirectX version numbers merely serve as unnecessary distractions.
Honorable mentions go to all of the text-based MUDs that still keep thousands of players entertained to this day — without any graphics.
And yes, I know I like ninjas.
The New PatrickMylund.com
Here we are — the first post on the new PatrickMylund.com. A mission statement, if you will. In a few years, this is the post I want to look back at and smile (or laugh) at what I’ve “accomplished”. Of course, this is also a chance for me to introduce myself and expand on what this website is about.
As you’ve undoubtedly deduced, my name is Patrick. I’m 20 years old at the time of writing, and I was born and raised in the Kingdom of Denmark, a small country bordering Germany as well as the Baltic and North seas.
I’ve always had a keen interest in computers and technology, from the Atari console in the Officer’s Lounge of a Maersk ship I had the opportunity to travel around the world on at the age of 4, to the family PC, an IBM Aptiva, at which I spent a lot of my time teaching myself such “programming languages” as MS-Batch and QBasic. Later I managed to install Red Hat Linux 3.0 (much to the remaining family’s dismay) and moved on to learning C. At age 11 I launched my first (albeit simple) text-based roleplaying game programmed in C.
This website serves as my outlet for writing about whatever happens to be on my mind. I’m not restricting myself to a particular niche, although I suspect the majority of my articles will concern technology in some fashion, as that is what I’m most passionate about. If you think of yourself as a computer nerd, and you enjoy spending your spare time fiddling with things related to computers and technology in general, chances are you’ll like a good deal of my rants.
One thing this blog will not be is your everyday run-at-the-mill tech news echo-blog. There are plenty of those out there, all reporting the same stories, ten times a day, every day. I’ve tried running one before, and I found it daunting and boring. I don’t want to tell you when every single version of X software is released, there are plenty of blogs and social news sites that will. I want my posts to have substance and an expiration date further than a few weeks into the future — basically, I want them to be as timeless as is possible when writing about things that are subject to Moore’s Law.
Let’s see if I can keep my word!
How to Set Up Ubuntu Linux 6.06 LTS LAMP Server
Many crinche at the thought setting up their own webserver. They think it’s terribly hard — and they’re right, to a certain extent. Until now, setting up a full-fletched LAMP server that actually works has been a task exclusively for the gifted. Well, no more. Regardless of your skill level, I will guide you through the entire installation process of Ubuntu 6.06 LTS Server, my favorite server distribution to date. It’s easy to use, it’s powerful, it’s secure, and it’s painless to configure.
The Ubuntu Server has no open ports after the installation and contains only the essential software needed to build a secure server.
Well, let’s begin!
Notice: The screenshots below may be obsolete, as the Ubuntu website has been redesigned. The other parts of this guide remain current (well, as current as Ubuntu 6.06).
Part 1: Preparing For Installation
Starting with the basics, we’ll find and download the appropriate ISO image for our system architecture. Then we’ll burn it and commence the installation process. If you’ve already downloaded and burnt the right ISO image, feel free to skip to Part 2: Boot-Up and Configuration. Be aware that “Ubuntu 6.06 LTS” is not the same as “Ubuntu 6.06 LTS Server”. They are two seperate images.
Getting the ISO Image
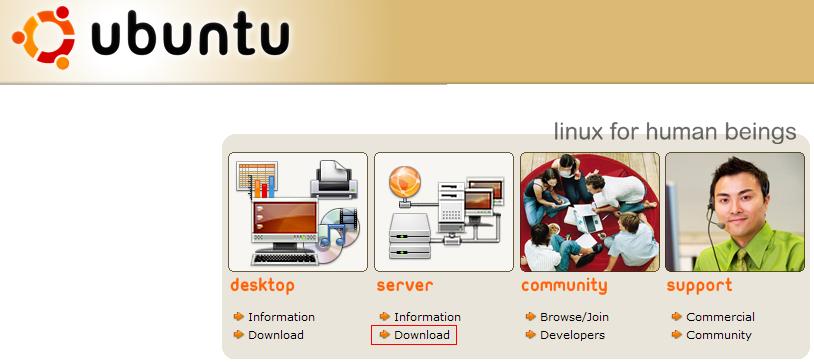 - First off, we’ll head over to Ubuntu.com and click the Server Download link.
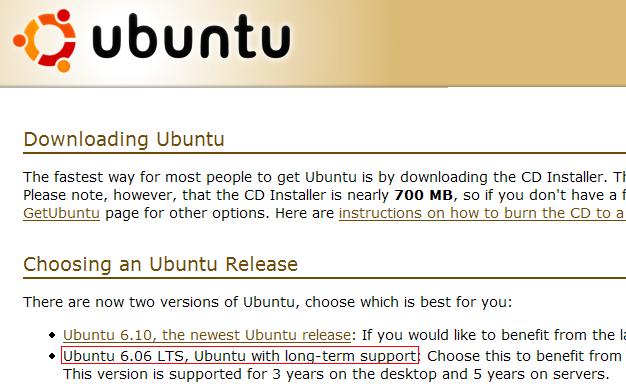 - On the Download page, select Ubuntu 6.06 LTS, Ubuntu with long-term support.
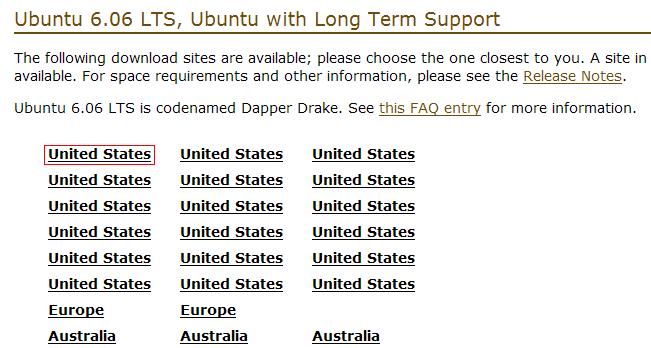 - Now select the region closest to you. Which you choose is irrelevant (they’re mirrors, thus no difference in content). I’ll select United States.
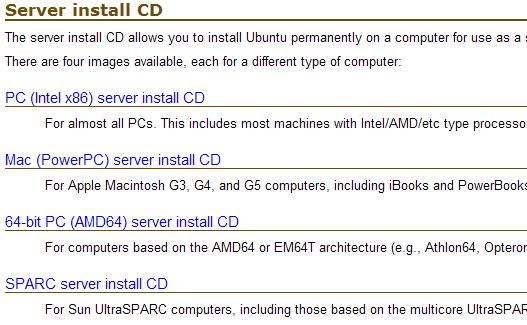 - Click on the respective download link for your system architecture. If you’re not sure what to get, chances are PC (x86) is the right one. If you’re running a Mac (NOT the ones with an Intel chipset), get the Mac (PPC) image. If 64-bit, get the 64-bit one, and so on. Please verify that you’re downloading your image in the Server section, not the Desktop, before continuing.
 Now grab a cup of coffee or a coke while you wait. You must.
Burning the ISO Image
Now that we’re done downloading the ISO image, we’ll use our favorite burning application to write the ISO to a CD-ROM. It is of utmost importance that you do not just copy the ISO file to a CD, but that you actually burn the image. Most writing applications have a feature called “Write Image”, “Write ISO to Disc”, “Burn ISO”, or similar. In Linux, the ‘k3b’ application (Nero equivalent) can do this with ease, so can Nautilus’ built-in CD writer (right-click the ISO in Gnome). Please see “How to Write ISO Files to CD in Windows” for Windows instructions, and “How do I burn an ISO image to CD in OS X? for Mac OS X instructions.
Get Ready to Install
When you’ve written the ISO image to a CD-ROM, please verify the contents of the disc. There should be several files and folders — if there’s only an .iso-file, you haven’t burnt the ISO. Please see the above instructions on how to burn it rather than copying.
If all looks fine, you’re done with Part 1! Let’s try it out in;
Part 2: Boot-Up and Configuration
Now that you’ve downloaded and burnt the Ubuntu Server ISO image, you’re ready to begin the installation. Go ahead and reboot your server with the CD in. If your system does not automatically boot from the CD-ROM, you’ll need to enable this in your server’s BIOS configuration. This option and the method to access it varies from BIOS to BIOS, but generally you’ll be able to enter the BIOS by pressing either F2 or DEL when your computer is starting up. When you’ve reached the BIOS configuration menu (usually blue), look for any option that states “Boot from CD-ROM” or an option that allows you to configure the priority of each drive. Some BIOSes are set to boot from the harddrive before booting from the CD-ROM. Change it so CD-ROM is the first thing your server tries, then save the settings and reboot.
 The screenshot to the right shows how my PhoenixBIOS is configured. The CD-ROM Drive is moved to the top, followed by Hard Drive and other network/removable devices.
 Booting Up
 Your server’s BIOS should now be set up correctly and should be booting from the CD-ROM drive. Hopefully you’re now seeing what is depicted in the screenshot to the right. Great! Now select Install a LAMP server and hit enter. You have begun the installation process.
 Configuring Regional Settings
You’re not very far from having a full-fletched server now. Hang on!
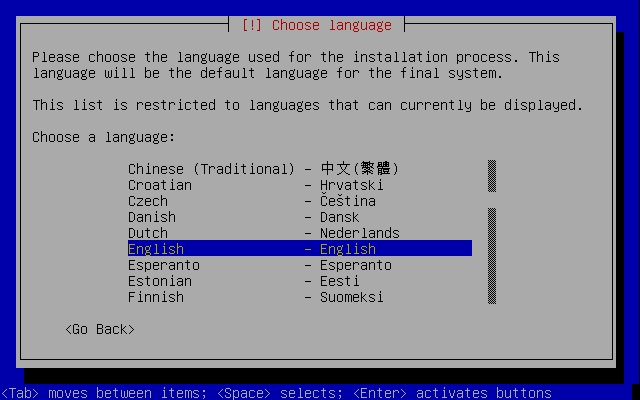 - Now we’ll select the language of our system. Be warned that this is not just for the installation, it is the language your system will use after installation, as well. This is, of course, changeable, but just go with the right language from the get-go. I’ll choose English (it’d suck for you if I chose my native tongue, Danish). Hit Enter.
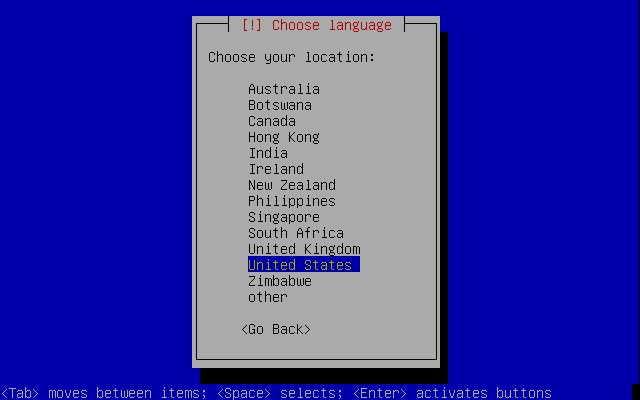 - Now, similarly, choose your location. The options vary depending on what language you chose in the previous step, so don’t be worried if you don’t see your country listed in the screenshot. If you select ‘other’ you will get a complete listing of languages. I’ll choose United States.
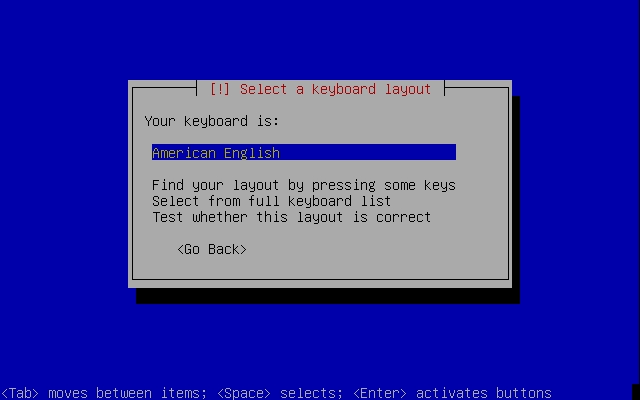 - The installer now asks for your keyboard type. The option displayed should be the correct one, so just hit Enter if it is. If not, try typing something or going through the list of keymaps.
The installer will now configure devices, load additional components, as well as load network hardware. In this How To, I’ll assume that you’re using either ADSL or DSL that does not require authentication. If you’re not, the installation will prompt you to enter the required information.
Configuring Networking
 - The installer will now ask you what you want to call your server. Call it anything you want, this can be changed later. I will call mine patricks-server. This is not your username, it’s the servers hostname. It’s what identifies the server on the network.
And the installer detects more hardware…
Congratulations, you’re done with Part 2. Get ready for the hardest part, partitioning. Don’t worry, I’ll take good care of you.
Part 3: Partitioning Your Drives
This is the single hardest part to guide anyone through, remotely. All system setups are different so it’s hard to tell you exactly how to set up your system. Whether or not you’re going to be using LVM, how many partitions to make, etc.
 - The standard options are pretty straight-forward, and I recommend you choose one of them if this process scares the living hell out of you. If you do choose one of them, feel free to skip to Part 4: Completing the Installation.
For the rest of this section, I will show you how I set up my system by manual partitioning. Please take my setup loosely — if there’s something that doesn’t fit you or something you’d prefer, adjust accordingly!
Manual Partitioning
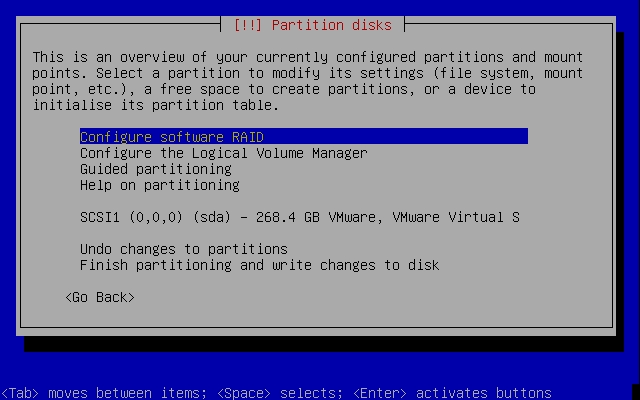 - This is the manual partitioning menu. The first two options (if they are shown) will allow you to set up a software RAID and Logical Volume Management. These, if you need them, will have to wait until we have configured our partitions. I will not be configuring either, as they are both unique to each configuration and pretty straight-forward to set up.
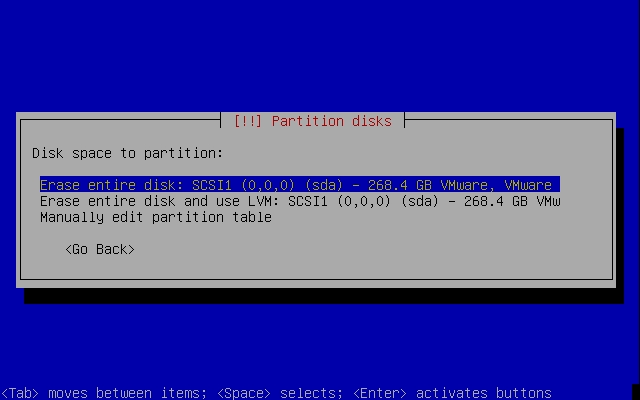
  - I have one harddrive, SCSI1 (0,0,0), a 268.4GB drive. To partition this drive, I’ll highlight it and hit Enter. A dialog will appear, asking me if I would like to create a new partition table, that will delete anything currently on the drive. I’ll hit Yes.
 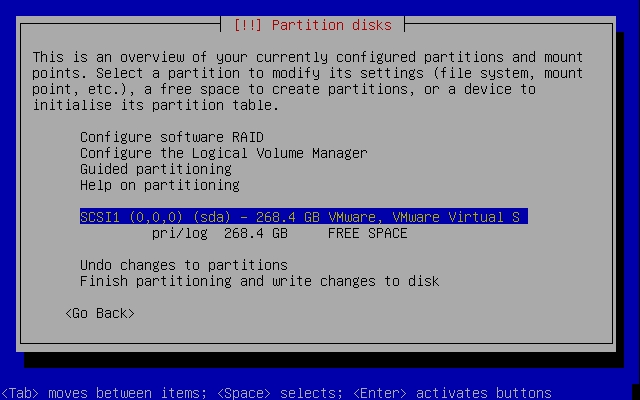 - This is the menu after deleting all partitions on the drive. Now I’m ready to set up new partitions.
  - Select the “FREE SPACE” entry below the drive and hit Enter. You can choose to let the installer set up partitions automatically, or you can make them yourself. I’ll select Create a new partition.
 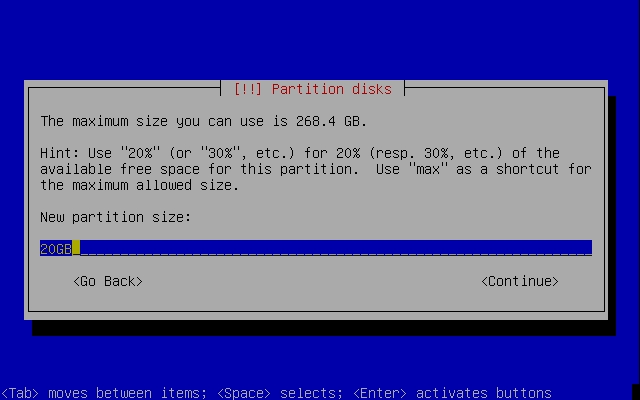 - Our first partition will be the root ( ‘/’ ) partition. This is where all our system files and applications are stored. If you want, you can allocate a percentage of the drive to root, and leave the rest for the ‘/home’ partition. I’d recommend something inside the 15-25GB range for a root you’re going to be using for a long time. Seperating your root and /home is useful if you need to re-install Linux. I’ll assign 20GB to root.
 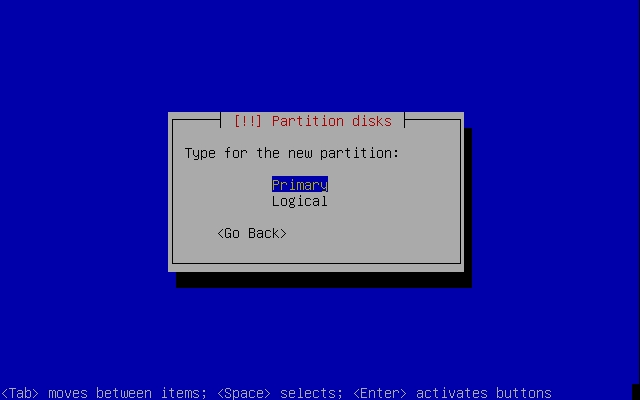 - Unless you’re going to have more than 4 partitions per drive, select Primary here. Logical partitions are ‘fake’ partitions created to circumvent the normal limit of 4 partitions.
 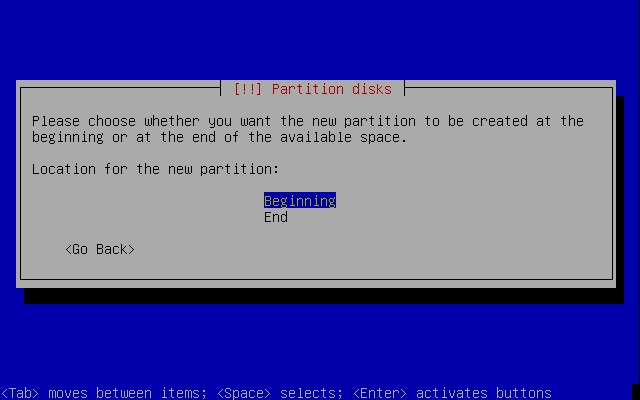 - Select Beginning. This tells the installer to position our root partition at the start of the available space.
 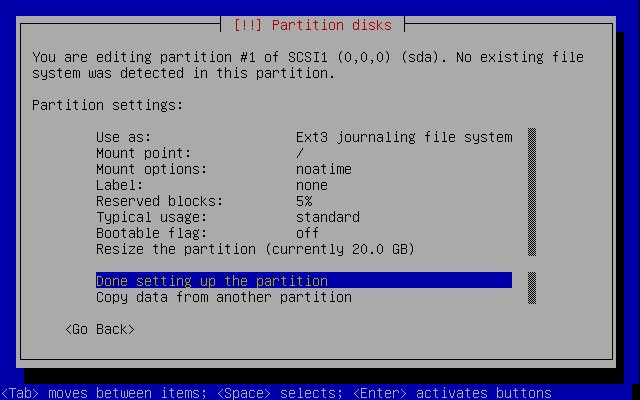 - You can choose to leave everything as it is here. A little tweak: In Mount Options you can choose to turn ‘noatime’ on, which will give you a significant speed boost. It disables generating a new time stamp every time a file is accessed. When you’re happy, select Done setting up the partition and hit Enter.
 Additional Partitions
Now that you know how to set up a new partition, do the following:
Following the same instructions as before, create a partition in the free space with a size roughly equal to half of your RAM, e.g. 512mb if you have 1GB of RAM. Make it a Primary partition as before, in the Beginning of the free space as well. When you get to the confirmation dialog, highlight the file system type (Use as:) and hit Enter. Select swap area from the menu. Accept the changes. The swap area acts as a substitute if all available RAM is being used.
Finally, create another partition, but /home rather than /. Ubuntu should automatically suggest this. Have this partition use the remaining space on your drive. Again, you can choose to enable ‘noatime’ to get a performance boost.
Verifying and Finalizing
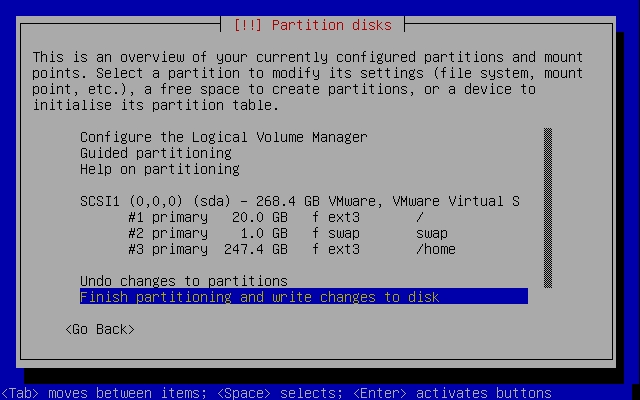 Your partition table should now look like this (or be similar). If you’re missing the swap space or the /home partition, don’t worry. You can mess around as much as you want. If all goes wrong, delete the entire partition table by selecting the drive itself, and start over.
If you’re all done, hit Finish partitioning and write changes to disk. A confirmation dialog will appear, asking you if you’re sure you want to apply these changes. Double-check the settings and hit Yes if it looks right.
You’re all done with partitioning! Get ready for the fun stuff in
Part 4: Completing the Installation
Now that you’re done partitioning, it’s time to complete the installation!
Setting Up the Timezone
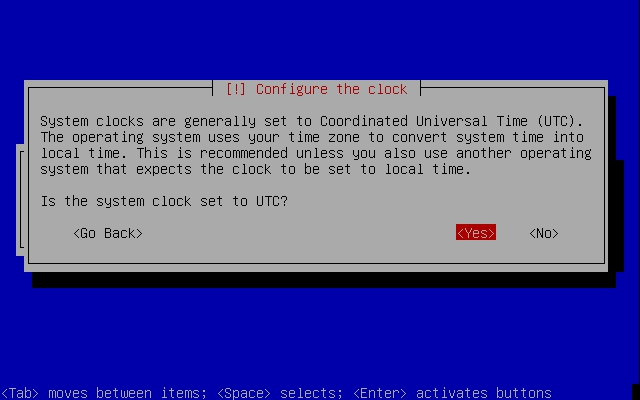 - The installer will ask you what timezone you’re in. Select the one that best fits you and continue. I’ll choose Eastern. If you are prompted to use UTC, hit Yes (unless you have a reason not to).
 Users and Passwords
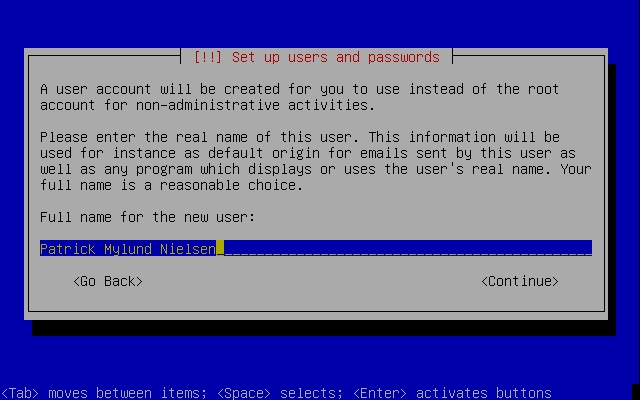 - The first dialog after having entered the timezone asks you for your real name, not the alias you want to log in with.
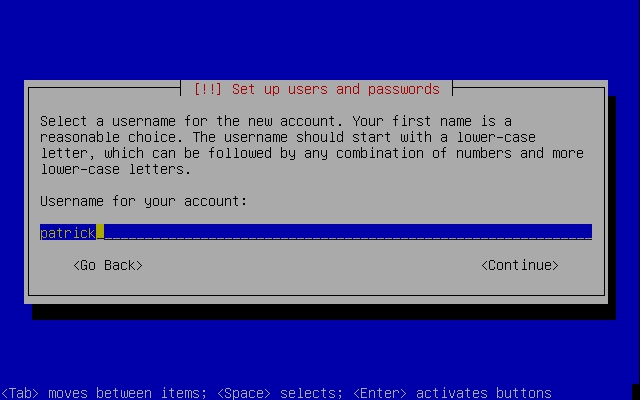 - Now I’m asked for my desired username. The username should start with a lower-case letter, which can be followed by any combination of numbers and letters. The installer suggests patrick. I’ll go with that.
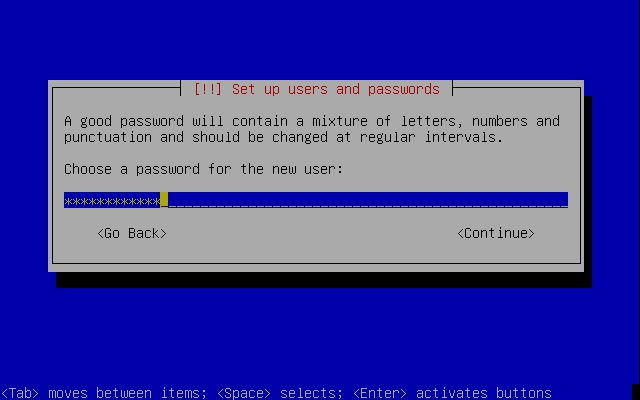 - Enter the password you’d like to associate with your account. This password will also be the password you use to perform actions that require ‘root’ access. In the next window, confirm the password by typing it again.
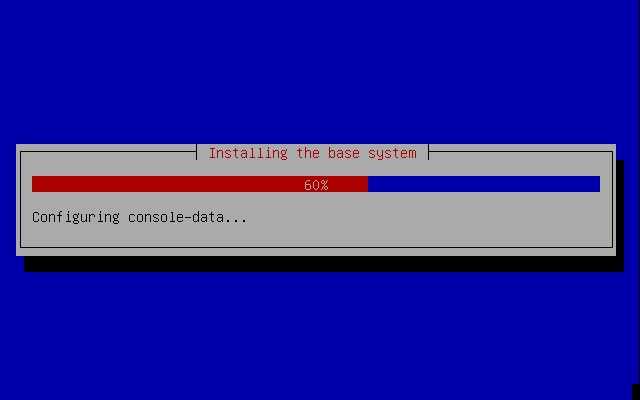 Sit back and relax as the installer completes installing Ubuntu Server on your computer. Let the installation process finish, eject the CD, and reboot your system. Congratulations, installation is done!
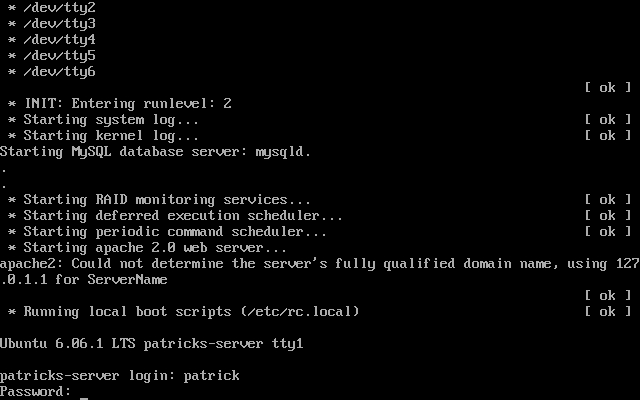 Linux should now initialize and prompt you for your username and password. If your screen looks something like this, all went well. Feel free to log in.
Setting up LAMP
 Wouldn’t it be great if our LAMP server just worked now, without us having to do anything? Well, it does! Try browsing to your servers IP in a browser, in my case http://192.168.0.6. Woot!
It’s time to do a few changes to our LAMP server. Normally, this would be a 3/4-hour process of manually editing config files and testing. Thanks to Ubuntu though, the installer does it all — better too. All we need to do is choose how we want our LAMP server to work.
By default, Apache2 uses /var/www/ as its document root. We’ll want to change this to our home folder in order to reap the space we’ve allocated.
- Log in, in case you haven’t. Type the exact command mkdir www - This will create the folder /home/patrick/www/ which we will be using as the document root of our server.
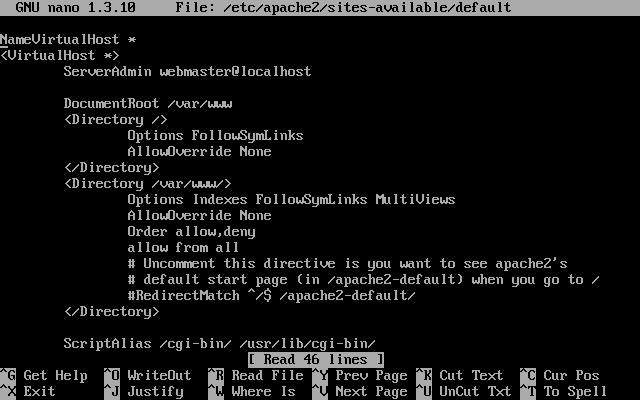 - Type the exact command: sudo nano -w /etc/apache2/sites-available/default and hit Enter. You will be prompted for your password. Enter it, and a text editor with our site’s config file will open (see screenshot to the right).
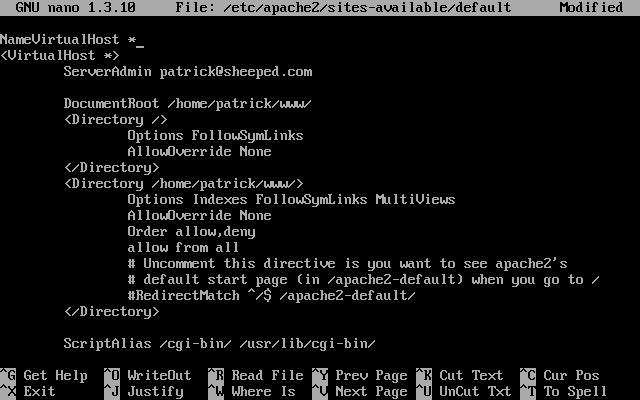 - Feel free to set the administrator e-mail to your own. Now, go through the document and replace all occurrences of /var/www/ to /home/patrick/www/, where ‘patrick’ is the username you chose during the installation. Navigate around with the arrow buttons. When done, hit CTRL+X then type Y and Enter to save the changes.
- Time to restart Apache to apply the changes. Type sudo /etc/init.d/apache2 restart
- Now, let’s see if this really works! Assuming you’re in your home folder (type cd to make sure), type cd www followed by ls. You should see.. nothing. Good.
 - Type nano -w index.php We’ll create a sample PHP script to test if the server and PHP is working.
 <?php echo “It’s working!” ?> will suffice. Again, hit CTRL + X followed by Y and Enter to save the contents.
 - Navigate to your server, e.g. http://192.168.0.5 — it works!
You’re done! Your server is working perfectly!
If you’re uncomfortable with the command-line interface, I recommend you look into guides for installing Webmin and phpMyAdmin for Ubuntu. Also, if you would like to administer your server from your own computer, you can install SSH with the command: sudo apt-get install ssh You can access it with applications like PuTTY.
In order to install phpMyAdmin (and more) with sudo apt-get install, you will first need to enable the universe repository. There’s a nice guide on how to do that from the CLI here.
25 Funny Analogies
These are awesome. Originally entries to a ‘bad analogy’ competition for high school students, many turned out to be surprisingly good:
- Her face was a perfect oval, like a circle that had its two sides gently compressed by a ThighMaster.
- His thoughts tumbled in his head, making and breaking alliances like underpants in a dryer without Cling Free.
- He spoke with the wisdom that can only come from experience, like a guy who went blind because he looked at a solar eclipse without one of those boxes with a pinhole in it and now goes around the country speaking at high schools about the dangers of looking at a solar eclipse without one of those boxes with a pinhole in it.
- She grew on him like she was a colony of E. Coli, and he was room-temperature Canadian beef.
- She had a deep, throaty, genuine laugh, like that sound a dog makes just before it throws up.
- Her vocabulary was as bad as, like, whatever.
- He was as tall as a six-foot, three-inch tree.
- The revelation that his marriage of 30 years had disintegrated because of his wife’s infidelity came as a rude shock, like a surcharge at a formerly surcharge-free ATM machine.
- The little boat gently drifted across the pond exactly the way a bowling ball wouldn’t.
- McBride fell 12 stories, hitting the pavement like a Hefty bag filled with vegetable soup.
- From the attic came an unearthly howl. The whole scene had an eerie, surreal quality, like when you’re on vacation in another city and Jeopardy comes on at 7:00 p.m. instead of 7:30.
- Her hair glistened in the rain like a nose hair after a sneeze.
- The hailstones leaped from the pavement, just like maggots when you fry them in hot grease.
- Long separated by cruel fate, the star-crossed lovers raced across the grassy field toward each other like two freight trains, one having left Cleveland at 6:36 p.m. traveling at 55 mph, the other from Topeka at 4:19 p.m. at a speed of 35 mph.
- They lived in a typical suburban neighborhood with picket fences that resembled Nancy Kerrigan’s teeth.
- John and Mary had never met. They were like two hummingbirds who had also never met.
- He fell for her like his heart was a mob informant, and she was the East River.
- Even in his last years, Granddad had a mind like a steel trap, only one that had been left out so long it had rusted shut.
- Shots rang out, as shots are wont to do.
- The plan was simple, like my brother-in-law Phil. But unlike Phil, this plan just might work.
- The young fighter had a hungry look, the kind you get from not eating for a while.
- He was as lame as a duck. Not the metaphorical lame duck, either, but a real duck that was actually lame, maybe from stepping on a land mine or something.
- The ballerina rose gracefully en Pointe and extended one slender leg behind her, like a dog at a fire hydrant.
- It was an American tradition, like fathers chasing kids around with power tools.
- He was deeply in love. When she spoke, he thought he heard bells, as if she were a garbage truck backing up.
See this page at the Washington Post for source and more.
Sick Of Your Slow Internet Connection? OpenDNS Solves!
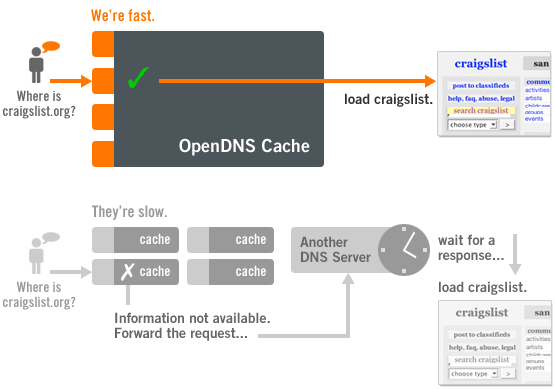
There’s a wide variety of things that will limit your online experience, a pretty common problem is simply lack of download and upload bandwidth, or hogging of same - but there’s another thing: DNS latency. OpenDNS, a service run by the founder of EveryDNS, might be just what you need.
Every time you want to access sites via their hostmasks, e.g. ‘www.google.com’ or ‘www.diggdot.us’, rather than their actual ‘names’ (IP addresses), e.g. 64.233.187.99, 64.71.156.11 - a query is sent to your DNS server asking, “What is Google.com?” - and it’s surprising how much slower the page load time can become because of that initial query, regardless of what connection you might have. Some ISP DNS servers have very poor respond times, ultimately leading to slower browsing, but fortunately there’s a free alternative.
If you use OpenDNS, you let their dedicated servers in various locations respond to your DNS requests instead of your ISP, and there’s a good chance they’ll respond a hell of a lot faster.
If you’re having applications hang with the indication that they’re looking for some host, e.g. Firefox saying “Looking for www.google.com…”, you should really try this out.
Other bonuses include automatic spelling correction, e.g. www.craigslist.og will take you to the .org site - Their server also blocks DNS requests to known phishing sites so your credit card information won’t be stolen.
Try changing your DNS server settings on either your computer or router to the following IP addresses (the OpenDNS servers) and check if it has a positive effect - you don’t need a login, specific operating system or anything like so, it works everywhere:- 208.67.222.222
<li>208.67.220.220</li></strong>You might be surprised.
For more information, visit www.opendns.com.